Why Do LSR Overmolded Parts Develop Black Spots, Streaks, or Surface Contamination?
- Share
- publisher
- siliconeplus
- Issue Time
- Jul 22,2026
Summary
LSR overmolded parts may develop black spots, white particles, color streaks, oily marks or localized curing defects because of raw-material handling, pre-cured silicone, pigment residue, mold deposits, contaminated inserts, dirty vents, operator handling or environmental particles. This guide explains how to identify, prevent and inspect contamination in precision LSR overmolding.
Introduction
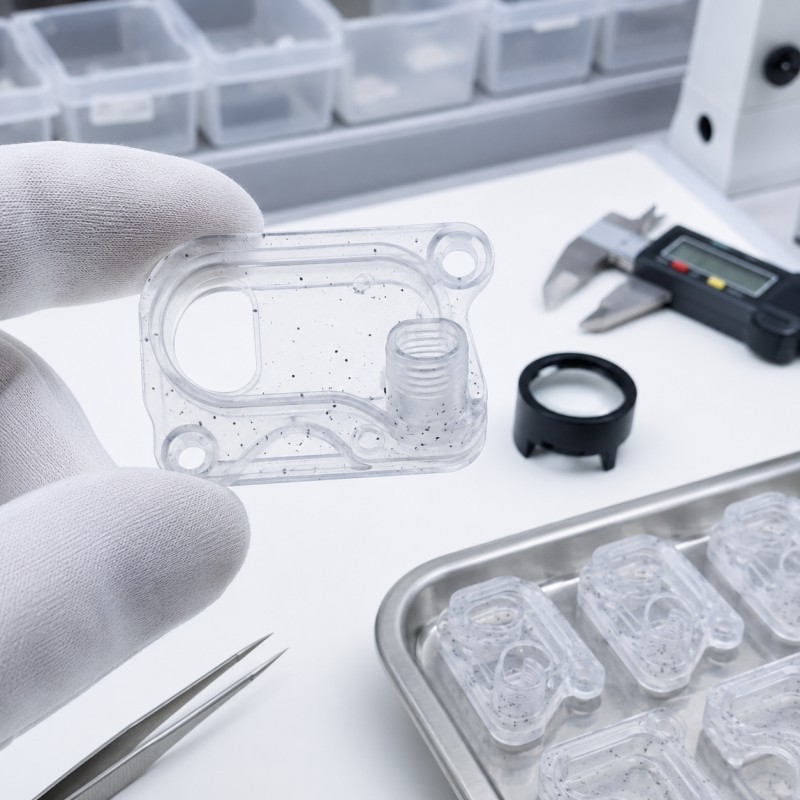
A precision LSR overmolded part may pass dimensional and functional inspection but still be rejected because of a small black spot, white particle, color streak, oily mark, cloudy area, or localized surface defect.
These defects are particularly noticeable on:
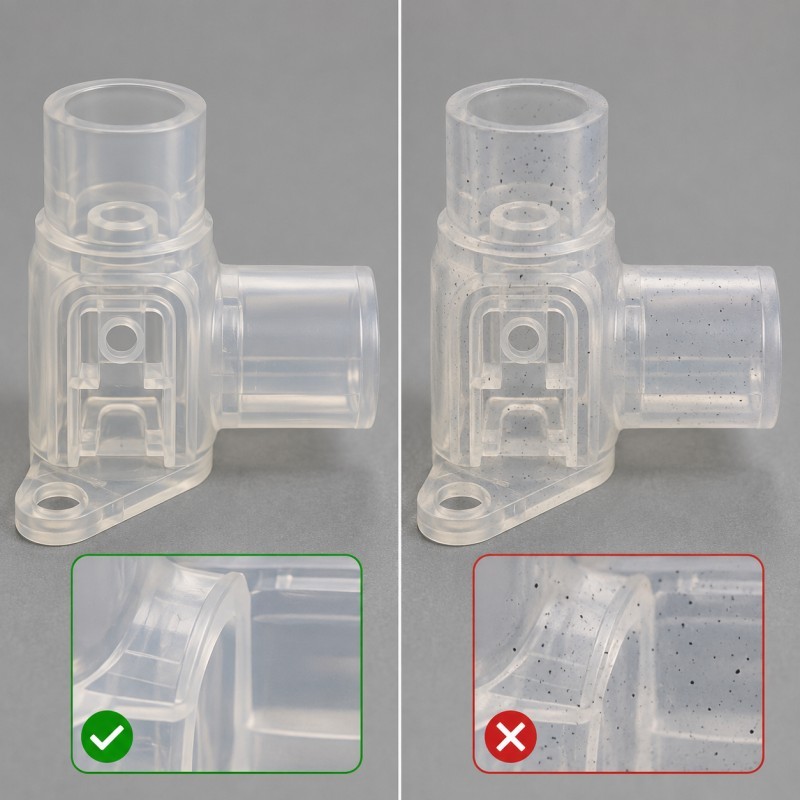
- Transparent LSR
- Translucent silicone
- White silicone
- Light pastel colors
- High-gloss surfaces
- Medical-device components
- Skin-contact parts
- Optical or sensor components
- Cosmetic Class-A surfaces
- Small precision electronic seals
A particle that appears minor in a photograph may represent several different conditions.
It may be removable surface dust. It may be a pigment residue from a previous production color. It may be a pre-cured silicone particle from the mixer. It may come from a dirty mold vent, oily insert, worn fixture, contaminated glove, packaging material, or another elastomer processed nearby.
The defect may affect only appearance.
However, contamination located at a silicone-to-substrate interface, sealing lip, electrical protection zone, thin membrane, or medical contact surface can also affect:
- Bonding
- Curing
- Waterproof performance
- Electrical insulation
- Surface cleanliness
- Product traceability
- Customer acceptance
- Long-term reliability
For engineers, quality teams, and OEM buyers, the correct question is not only:
“Can we see a black spot?”
The more important questions are:
- Is the defect on the surface or inside the silicone?
- Is it removable or permanently molded into the part?
- Does it come from the material, mold, insert, equipment, operator, or environment?
- Does it affect curing, bonding, sealing, or electrical performance?
- Can the same defect be prevented consistently during mass production?
This guide explains how contamination develops during precision liquid silicone injection molding and how buyers and manufacturers should control it from material handling through final packaging.
Answer Excerpt
Black spots, white particles, color streaks, oily marks, and surface contamination in LSR overmolded parts can come from raw-material exposure, pre-cured silicone inside supply lines or mixers, pigment residue, mold deposits, excessive release agent, dirty vents, insert oil, dust, fibers, worn fixtures, operator handling, packaging materials, or cross-contamination from other production processes.
Not every visible spot has the same cause.
A removable surface fiber requires a different corrective action from a particle molded inside the silicone, an oil-contaminated bonding interface, a pigment streak, a trapped-air mark, or a localized uncured area.
Reliable control requires material traceability, clean equipment, controlled color changes, insert-cleaning standards, mold-maintenance procedures, suitable handling areas, defined visual inspection conditions, cavity traceability, and pilot-production validation.
1. What Is Contamination in LSR Overmolding?
Contamination is any unintended material, residue, particle, chemical, color, or surface condition introduced into the silicone part or its bonding interface.
It may originate from:
- Raw silicone material
- Color paste
- Metering equipment
- Static mixer
- Supply lines
- Injection unit
- Cold runner
- Mold cavity
- Venting channel
- Insert
- Loading fixture
- Operator
- Work surface
- Airborne dust
- Packaging
- Previous production material
Contamination may remain:
- On the outside surface
- Inside the silicone layer
- At the silicone-to-insert interface
- Around a sealing lip
- Inside a hole or groove
- Near a gate
- At the end of the flow path
- Around an FPC edge
- Near a metal terminal
- Inside a transparent component
The first step is to determine where the defect is located.
A surface particle may be removable through controlled cleaning. A particle embedded inside cured silicone cannot normally be removed without damaging the component.
2. Different Defects Can Look Similar
Several different defects may initially appear to be “black spots” or “dirty silicone.”
Black or Dark Spots
Possible sources include:
- Dark pigment residue
- Pre-cured silicone particles
- Mold deposits
- Dust
- Oil-contaminated particles
- Worn fixture material
- Previous production residue
- Insert debris
White or Light Particles
Possible sources include:
- Fibers
- Packaging dust
- Material fragments
- Mold-cleaning residue
- Air-related defects
- Incomplete pigment dispersion
- Surface contamination
Color Streaks
Possible causes include:
- Incomplete color mixing
- Residue from a previous color
- Unstable pigment dosing
- Material remaining inside the supply path
- Flow-front variation
- Local curing differences
Oily or Glossy Marks
Possible causes include:
- Insert oil
- Mold-release residue
- Lubricant
- Cleaning-agent residue
- Surface treatment
- Local mold-polish differences
- Handling contamination
Tacky or Uncured Areas
Possible causes include:
- Incorrect A/B ratio
- Insufficient curing
- Low or uneven mold temperature
- Contaminated material
- Catalyst inhibition
- Pre-cured material affecting the mixer
- Unstable dosing
A defect should not be classified only by color.
The investigation should also consider texture, location, depth, removability, hardness, cavity number, production time, and whether the defect repeats in the same position.
3. Raw-Material Handling Is the First Control Point
LSR normally arrives as separate A and B components.
Before entering production, the material should be controlled through:
- Supplier and grade identification
- Batch or lot number
- Manufacturing or expiry information
- Storage conditions
- Container integrity
- Opening date
- Color-paste batch
- Material change record
- Incoming inspection
- Traceability label
Risks increase when:
- Containers remain open
- Covers are not replaced correctly
- Material is transferred through dirty tools
- Different grades use the same uncontrolled equipment
- Color paste is added in an exposed environment
- Batch identification is lost
- Old and new materials are combined without control
- Material is stored outside the supplier’s specified conditions
Material should not be judged only by whether it can still be pumped into the machine.
For precision, transparent, medical, or appearance-sensitive projects, the material history should remain traceable from incoming inspection to the finished production batch.
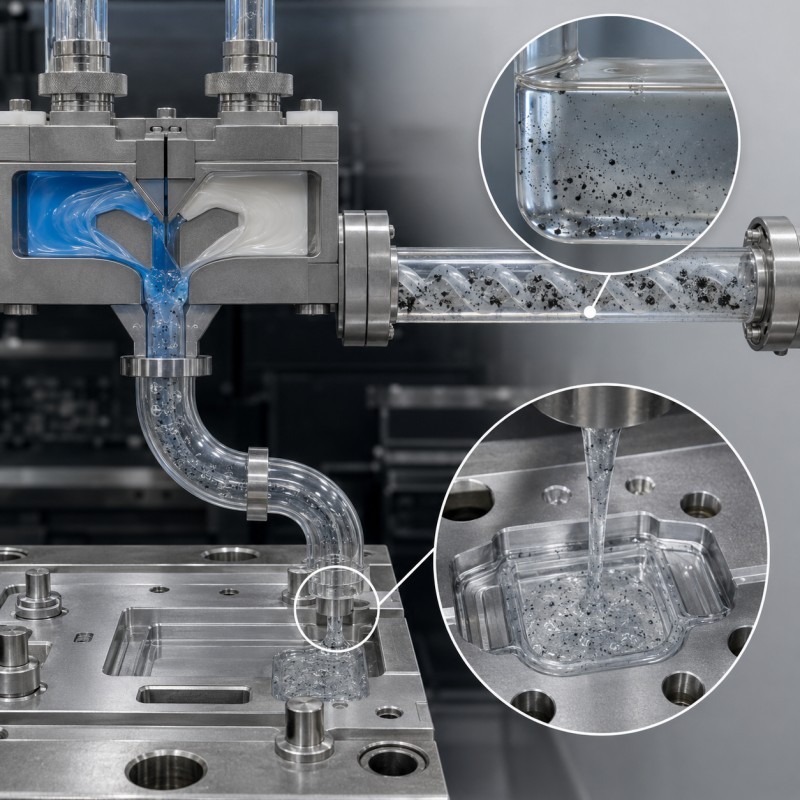
4. Pre-Cured Material Can Form Particles Inside the System
Small areas of silicone may begin curing inside:
- Static mixers
- Supply hoses
- Valves
- Nozzles
- Dead corners
- Injection units
- Cold-runner interfaces
- Heated areas
These partially or fully cured particles may later break loose and enter the mold cavity.
Possible results include:
- Black or dark particles
- Clear gel particles
- Hard spots
- White inclusions
- Surface pits
- Flow disturbance
- Blocked gates
- Incomplete filling
- Local appearance variation
Dow’s LSR troubleshooting guidance specifically recommends cleaning supply lines and mixers when pre-cured particles or affected areas are present and checking the meter-mix system when curing is unstable.
The investigation should review:
- Equipment shutdown procedure
- Production interruption time
- Mixer replacement interval
- Material residence time
- Temperature near the mixer
- Start-up purging
- End-of-run cleaning
- Dead zones in the supply system
- Maintenance records
A defect caused by pre-cured material cannot be corrected reliably through final-product cleaning.
The particle source must be removed from the equipment.
5. Cross-Contamination Can Affect Platinum-Cured LSR
Platinum-cured silicone systems can be sensitive to certain contaminants.
WACKER’s processing guidance warns that small amounts of catalyst poisons may inhibit curing, particularly amine- and sulfur-containing compounds associated with some organic rubber systems. It recommends separating platinum-catalyzed silicone from organic rubber and cleaning processing machinery carefully to avoid cross-contamination.
Potential cross-contamination routes include:
- Equipment previously used for another elastomer
- Shared mixing tools
- Shared containers
- Shared gloves
- Adjacent production areas
- Contaminated air or work surfaces
- Sulfur-containing rubber components
- Certain adhesives or chemicals
- Uncontrolled mold-cleaning products
- Unverified release agents
Possible symptoms include:
- Local tackiness
- Incomplete curing
- Soft spots
- Surface transfer
- Poor dimensional stability
- Weak mechanical performance
- Bonding failure
- Unusual appearance
The corrective action should identify the contaminant source rather than simply increasing curing time.
6. Pigment Residue Can Cause Streaks and Wrong-Color Particles
LSR may be molded in:
- Natural transparent material
- White
- Black
- Gray
- Customer-specific Pantone colors
- Translucent colors
- Multi-color combinations
During a color change, residual material may remain in:
- Color dosing equipment
- Hoses
- Mixer
- Valve
- Nozzle
- Cold runner
- Gate
- Mold cavity
- Material container
A small amount of dark pigment can create highly visible defects in white, transparent, beige, light blue, or other pastel parts.
Color-related defects may include:
- Black dots
- Dark streaks
- Cloudy bands
- Inconsistent transparency
- Local color concentration
- Previous-color particles
- Cavity-to-cavity variation
A controlled color-change procedure should define:
- Production stop and identification
- Material removal
- Equipment cleaning or purging
- Mixer or disposable component replacement
- Mold inspection
- Trial-shot quantity
- First-piece visual approval
- Batch traceability
- Release to mass production
The first acceptable-looking part should not automatically release the full production run.
Several consecutive parts should be evaluated to confirm that the previous color has been completely removed.
7. Mold Deposits Can Transfer to the Product
Repeated production can leave deposits on:
- Cavity surfaces
- Parting lines
- Vents
- Gates
- Core pins
- Shutoff areas
- Textured surfaces
- Ejector or moving components
- Cold-runner interfaces
Possible sources include:
- Silicone residue
- Color paste
- Release agent
- Insert oil
- Primer
- Dust
- Burned residue
- Cleaning-agent residue
- Material carried by the flow front
WACKER states that excess mold-release agent may form deposits on the hot mold wall, cause inhomogeneities in the finished product, and interfere with flow-front joining.
Mold deposits can produce:
- Repeating spots in the same location
- Surface gloss differences
- Texture loss
- Color transfer
- Short shots
- Flow marks
- Weak seams
- Flash
- Poor demolding
- Embedded particles
A defect that repeats at the same location in one cavity should trigger inspection of the corresponding mold area.
8. Dirty Vents Can Create Marks That Resemble Contamination
Mold vents allow air to escape as silicone fills the cavity.
When a vent becomes blocked by silicone residue, oil, dust, or deposits, air may become trapped or compressed.
Possible defects include:
- White edges
- Dark or burned-looking marks
- Bubbles
- Short shots
- Rough surfaces
- Weak meeting lines
- Incomplete sealing lips
- Local discoloration
Dow’s troubleshooting guide identifies soiled or incorrectly sized venting channels as a cause of bubbles and visible white edges and recommends cleaning the mold and vents.
The defect may therefore look like a material particle even when the actual cause is poor air release.
A controlled mold venting design and cleaning schedule should consider:
- Final filling location
- Insert geometry
- Gate direction
- Vent depth and width
- Flash requirement
- Cleaning interval
- Continuous-run duration
- Cavity identification
- Mold-maintenance records
9. Insert Cleanliness Directly Affects Overmolding Quality
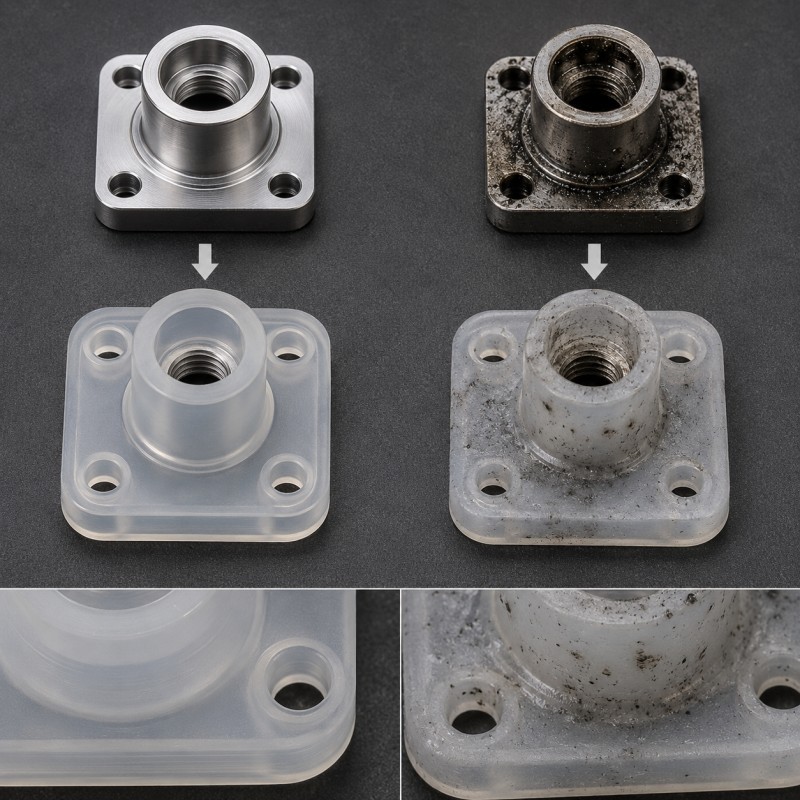
An overmolded part contains both silicone and another component.
The insert may carry contamination into the mold through:
- Injection-molding release residue
- Stamping oil
- CNC coolant
- Cutting fluid
- Dust
- Fingerprints
- Packaging fibers
- Oxidation
- Primer residue
- Adhesive
- Protective film
- Storage contamination
Contamination on the insert can remain:
- Under the silicone
- Along the bonding edge
- Around a sealing path
- Near an electrical contact
- Inside a mechanical lock
- At a visible exposed boundary
The problem may cause more than a cosmetic spot.
It may reduce the effective bonding area, interfere with surface treatment, create a leakage path, or produce local edge lifting.
Insert-cleaning requirements should be defined before tooling and confirmed again during incoming inspection and pilot production.
10. Plastic Inserts Require Controlled Storage and Handling
Silicone over plastic projects require the insert surface, dimensions, storage condition and molding history to remain controlled before overmolding.
Plastic inserts may contain:
- Mold-release residue
- Dust from trimming
- Plastic particles
- Packaging fibers
- Fingerprints
- Static-attracted dust
- Oil from assembly
- Surface-treatment residue
Some plastic parts are stored for a period before LSR overmolding.
During storage they may also experience:
- Dust exposure
- Moisture change
- Warpage
- Surface oxidation or aging
- Contact with paper or foam packaging
- Mixed-batch handling
Silicone over plastic projects should define:
- Exact plastic grade
- Plastic-lot traceability
- Insert-cleaning method
- Cleaning-to-molding time
- Storage container
- Glove requirement
- Surface-treatment timing
- Incoming visual standard
- Rejection criteria
A carefully cleaned sample insert does not prove that the normal production supply will arrive in the same condition.
11. Metal Inserts May Carry Oil, Burrs, or Plating Residue
Silicone over metal projects require controlled cleaning and inspection of terminals, pins, stamped parts, machined inserts and plated surfaces.
Metal inserts can include:
- Stamped terminals
- Stainless-steel plates
- Aluminum housings
- Copper contacts
- Brass parts
- Threaded inserts
- Pins
- Sensor probes
Potential contamination sources include:
- Stamping oil
- CNC coolant
- Polishing compound
- Metal chips
- Burr fragments
- Plating residue
- Oxidation
- Fingerprints
- Cleaning-agent residue
- Packaging dust
Silicone over metal projects should review both cleanliness and edge condition.
A metal chip or burr can:
- Appear as an embedded black or bright particle
- Damage the mold
- Prevent proper shutoff
- Cut the silicone
- Reduce bonding stability
- Create flash
- Affect electrical clearance
Metal cleanliness should be checked before the insert reaches the molding machine rather than after the finished part fails inspection.
12. FPC, Cable, and Electronic Inserts Need Special Handling
FPC silicone overmolding projects may contain several materials and require controlled handling before mold loading:
- Polyimide film
- Copper traces
- Coverlay
- Adhesives
- Stiffeners
- Solder joints
- Electronic components
- Connector pads
- Cable insulation
Contamination may come from:
- Soldering flux
- Cleaning solvent
- Protective film
- Tape
- Adhesive
- Operator handling
- Cable-processing residue
- Dust around components
- Packaging trays
- Cut FPC edges
FPC silicone overmolding must protect the circuit while keeping contact pads, test points, and functional areas clean.
The handling plan may require:
- Defined gloves or tools
- Clean support fixtures
- Protective trays
- Controlled film removal
- Visual inspection before loading
- Limited open exposure time
- Traceability by insert batch
- Electrical inspection after molding
A contaminated or damaged FPC surface cannot be corrected by optimizing only the LSR injection parameters.
13. Operators and Work Surfaces Can Introduce Particles
Manual operations may include:
- Insert loading
- Mold unloading
- Part separation
- Visual inspection
- Secondary trimming
- Assembly
- Cleaning
- Packaging
Each operation creates possible contamination routes.
Common sources include:
- Hair
- Clothing fibers
- Gloves
- Wiping cloths
- Paper
- Cardboard
- Worktable residue
- Hand lotion
- Tool lubricant
- Food or drink near the work area
- Uncontrolled personal items
The production instruction should define:
- Approved gloves
- Cleaning frequency
- Work-surface material
- Tool storage
- Product trays
- Open exposure time
- Operator clothing
- Handling method
- Nonconforming-part segregation
- Packaging timing
A technically advanced mold cannot compensate for uncontrolled handling after demolding.
14. Static Electricity Can Attract Airborne Particles
Flexible silicone, plastic inserts, protective film, trays, and packaging can generate static during:
- Demolding
- Film removal
- Conveyor movement
- Rubbing
- Part separation
- Bagging
- Stacking
- Transportation
Static may attract:
- Dust
- Fibers
- Hair
- Lightweight plastic particles
- Packaging debris
Possible control methods include:
- Reduced unnecessary rubbing
- Clean trays
- Controlled handling
- Suitable environmental control
- Ionizing equipment where appropriate
- Prompt packaging after inspection
- Reduced open exposure
- Anti-static work surfaces
Any additive or surface treatment should be evaluated against the product’s material, bonding, electrical, medical, skin-contact, or regulatory requirements before use.
15. Product Color Changes How Contamination Appears
The same particle may look very different on different products.
Transparent LSR
Transparent parts may reveal:
- Internal particles
- Micro-bubbles
- Flow boundaries
- Insert shadows
- Embedded fibers
- Cloudy areas
White and Pastel LSR
Light colors make dark particles and oil marks easier to see.
A small residue from a previous black, blue, or red batch may become a critical cosmetic defect.
Black or Dark LSR
Dark products may hide some embedded particles but show:
- White fibers
- Dust
- Gloss variation
- Surface scratches
- Stretch whitening
- Packaging residue
The appearance standard should be developed for the actual material, color, thickness, texture, and lighting condition.
16. Contamination Can Affect Bonding, Curing, and Sealing
A visual defect may also indicate a functional risk.
Contamination at the interface can reduce:
- Silicone-to-plastic bonding
- Silicone-to-metal bonding
- FPC encapsulation stability
- Mechanical-lock filling
- Sealing continuity
- Electrical insulation coverage
Catalyst inhibition or incorrect mixing may create:
- Soft areas
- Tacky surfaces
- Low tear strength
- Dimensional instability
- Poor recovery
- Weak bonding
- Surface transfer
Oil or particles on a sealing lip may create:
- Uneven compression
- Local leakage
- Assembly interference
- Surface indentation
- Reduced inspection reliability
Material compatibility, surface preparation, cleanliness, curing, and structural design should therefore be evaluated together rather than as separate quality topics.
17. Cleanroom Production and Clean Production Are Not the Same
Not every LSR overmolded part requires a certified cleanroom.
However, every precision project requires a defined production-cleanliness standard.
The required environment depends on:
- Product application
- Medical classification
- Skin-contact condition
- Optical requirement
- Electrical requirement
- Cosmetic standard
- Customer specification
- Packaging requirement
- Target market
Possible production levels include:
- Standard controlled manufacturing
- Dedicated clean work zone
- Anti-static work area
- Controlled packaging area
- Customer-specified cleanroom production
- Medical-device quality system
- Special environmental monitoring
The buyer should state the required cleanliness level before quotation and tooling.
The manufacturer should not describe ordinary visual cleanliness as cleanroom manufacturing unless the applicable facility, process, documentation, and customer requirements have been confirmed.
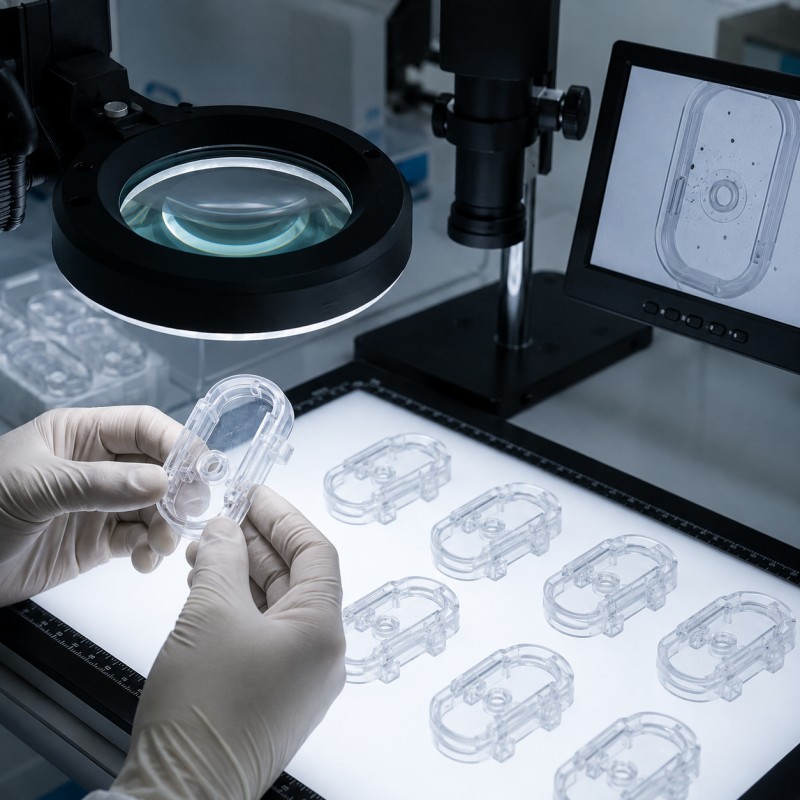
18. Define a Measurable Appearance Standard
Statements such as “no black spots” or “the surface must be perfectly clean” are difficult to apply consistently without inspection conditions.
A practical appearance specification should define:
- Product color
- Surface texture
- Critical surface areas
- Non-critical hidden areas
- Inspection lighting
- Background
- Viewing distance
- Viewing angle
- Inspection time
- Magnification, when required
- Maximum particle size
- Maximum particle quantity
- Acceptable color variation
- Removable versus embedded particles
- Cavity identification
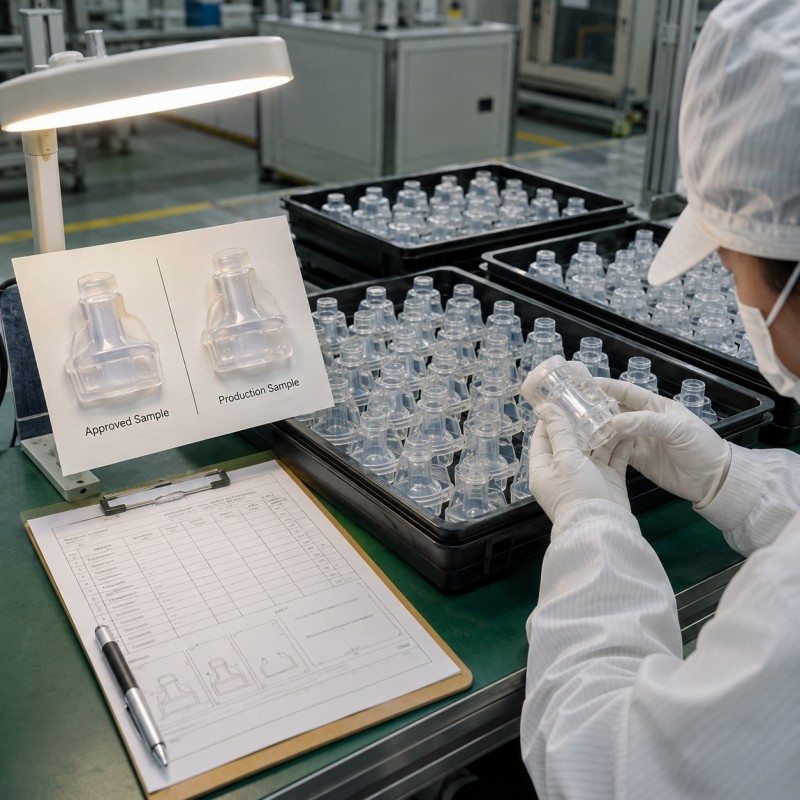
- Reference samples
The standard may divide the product into:
- Class-A visible surface
- Functional sealing surface
- Bonding boundary
- Internal protected surface
- Hidden assembly surface
A particle acceptable on a hidden non-functional area may be unacceptable on a medical contact surface, optical zone, electrical interface, or sealing lip.
19. Why Can Samples Pass but Mass Production Become Contaminated?
Engineering samples are normally produced in small quantities and under close supervision.
During sampling:
- New or recently cleaned equipment may be used
- Inserts may be selected individually
- Mold surfaces are clean
- Production time is short
- Operators inspect every part
- Only one color and material batch may be used
- Packaging exposure is limited
Mass production introduces:
- Longer continuous runs
- Mold deposits
- Dirty vents
- Multiple material batches
- Multiple insert batches
- Operator changes
- Color changes
- Mixer wear
- Fixture wear
- Packaging exposure
- Longer storage
- More handling operations
A process that produces twenty clean samples may still develop particles after several thousand cycles.
Pilot production should evaluate:
- Beginning, middle, and end of the run
- Every mold cavity
- Different insert batches
- Different material batches
- Continuous-run cleanliness
- Mold-cleaning intervals
- Vent-cleaning intervals
- First-piece and periodic inspection
- Final packaging condition
This is part of keeping LSR overmolded parts consistent from prototype to mass production. SiliconePlus’s current production-consistency guide also emphasizes material traceability and incoming inspection for specialized LSR systems.
20. A Practical Contamination Failure-Analysis Sequence
When black spots, particles, streaks, or oily marks appear, investigate the problem systematically.
Recommended sequence:
- Record the exact defect type.
- Mark the location on the drawing.
- Determine whether it is removable.
- Check whether it is on the surface or embedded inside.
- Identify the mold cavity.
- Record the production time and sequence.
- Compare passing and failing samples.
- Review material and pigment batch numbers.
- Inspect the material containers.
- Check supply lines, mixer, valves, and nozzle.
- Inspect the mold cavity, gate, vents, and parting line.
- Check whether the defect repeats in the same location.
- Inspect the insert before overmolding.
- Review insert cleaning and storage.
- Check operator gloves, trays, tools, and work surfaces.
- Review the previous material and production color.
- Inspect packaging materials.
- Use magnification or cross-section analysis when necessary.
- Change one controlled variable.
- Repeat production and document the result.
Do not simultaneously change material, color paste, mold cleaner, insert-cleaning method, and inspection standard.
Changing one controlled variable at a time makes the root cause easier to confirm.
21. What Should Be Validated Before Mass Production?
Before approving a precision LSR overmolded part, buyers and manufacturers should confirm:
- Final LSR grade
- Material batch traceability
- Color-paste system
- Material storage requirement
- Material-opening procedure
- Meter-mix equipment
- Mixer replacement interval
- Production start-up procedure
- Color-change procedure
- Mold-cleaning method
- Vent-cleaning interval
- Mold-release policy
- Insert material
- Insert-cleaning standard
- Insert storage
- Surface-treatment timing
- Operator-handling method
- Product trays
- Work-area cleanliness
- Static-control requirement
- Critical visual surfaces
- Particle-size standard
- Inspection lighting
- Inspection frequency
- Cavity traceability
- Pilot-production quantity
- Packaging cleanliness
- Reference samples
- Nonconforming-product process
- Corrective-action records
For medical, transparent, optical, skin-contact, or highly cosmetic products, the inspection and documentation requirements should be confirmed before tooling and quotation.
How SiliconePlus Supports Contamination-Controlled LSR Projects
SiliconePlus provides custom liquid silicone injection molding and silicone overmolding services for precision components used in automotive electronics, 3C electronics, medical devices, sensors, wearable products, beauty devices, and industrial equipment.
Our project support can include:
- DFM and drawing review
- LSR material and color evaluation
- Material traceability planning
- Liquid silicone injection molding
- Silicone over plastic
- Silicone over metal
- FPC silicone overmolding
- Insert-cleanliness review
- Surface-treatment coordination
- Mold-venting review
- Custom mold development
- Sample and pilot production
- Appearance inspection
- Optical and dimensional inspection
- Cavity traceability
- Packaging coordination
- OEM/ODM mass production
With 25+ years of silicone manufacturing experience, our team helps buyers review contamination risks throughout the complete manufacturing process.
This includes:
- Material
- Pigment
- Equipment
- Mold
- Insert
- Fixture
- Operator
- Work area
- Inspection
- Packaging
- Mass-production traceability
The objective is not only to sort out defective products after molding.
The objective is to identify contamination routes, establish preventive controls, and maintain stable appearance and functional quality throughout continuous production.
What Information Should Buyers Send for Evaluation?
To evaluate an LSR contamination or surface-defect project, buyers should provide:
- 2D drawing
- 3D file
- Product photographs
- Close-up defect photographs
- Defect videos, when available
- Silicone material
- Silicone hardness
- Product color
- Transparency requirement
- Substrate material
- Insert-cleaning method
- Surface-treatment information
- Critical appearance areas
- Critical sealing areas
- Medical or cleanroom requirements
- Current inspection standard
- Particle-size requirement
- Mold-cavity number
- Material batch
- Insert batch
- Production time
- Packaging method
- Affected quantity
- Estimated future quantity
When possible, provide both passing and failing samples from different production times and mold cavities.
Frequently Asked Questions
Why do black spots appear inside transparent LSR?
Possible causes include pre-cured silicone particles, pigment residue, mold deposits, insert debris, equipment contamination, fibers, or material introduced during handling. The particle location and production history should be investigated.
Can black spots be removed after molding?
Surface dust or fibers may sometimes be removed through an approved cleaning method. Embedded particles, pigment streaks, or contamination inside cured silicone normally cannot be removed without damaging the product.
Why does the defect always appear in the same position?
A repeating position may indicate mold deposits, a dirty vent, damaged cavity surface, gate contamination, insert-contact residue, or a fixture-related source.
Why do spots appear only after long production runs?
Long runs can create mold deposits, dirty vents, pre-cured material, mixer buildup, fixture wear, handling contamination, or a longer period of environmental exposure.
Can more mold-release agent reduce contamination?
Not necessarily. Excess release agent can form deposits and create product inhomogeneity. The release method must match the material, mold, application, and supplier guidance.
Can contamination cause incomplete LSR curing?
Yes. Certain contaminants can interfere with platinum-catalyzed curing. Incorrect mixing ratio, temperature, or curing time may also cause tacky or uncured areas.
Why do white parts show more contamination than black parts?
White and pastel colors create strong contrast with dark particles. Black parts may instead show white fibers, dust, gloss differences, or scratches more clearly.
Does every medical LSR part require cleanroom production?
No single production environment applies to every medical component. The required facility, cleanliness level, documentation, packaging, and quality system depend on the device, contact type, customer specification, and target-market requirements.
How should contamination be inspected?
Inspection may include controlled visual inspection, magnification, optical inspection, wipe testing, dimensional checks, cavity traceability, cross-section analysis, or customer-specific laboratory analysis.
What should buyers approve before mass production?
Buyers should approve material, color, insert condition, cleanliness standard, critical surfaces, inspection lighting, acceptable particle limits, packaging, pilot-production samples, and final reference samples.
Conclusion
Black spots, white particles, color streaks, oily marks, and surface contamination in LSR overmolding are not caused by one universal molding parameter.
The defect may originate from raw material, pigment, pre-cured silicone, supply lines, mixer, mold deposits, dirty vents, release agents, plastic or metal inserts, FPC handling, operator contact, airborne particles, static electricity, or packaging.
The appearance of the defect alone is not enough to determine the cause.
The most reliable approach is to identify whether the contamination is removable or embedded, trace the affected cavity and batch, inspect the complete material and production path, and change one controlled variable at a time.
If you are developing a transparent, white, medical, cosmetic, electronic, automotive, or precision LSR overmolded component with strict cleanliness requirements, contact SiliconePlus and send us your drawing, substrate material, silicone grade, product color, defect photographs, cleanliness standard, affected batch information, testing requirements, and estimated quantity. Our engineering team will review the project and provide practical manufacturing recommendations.